It may be useful to check a User Path under particular conditions.
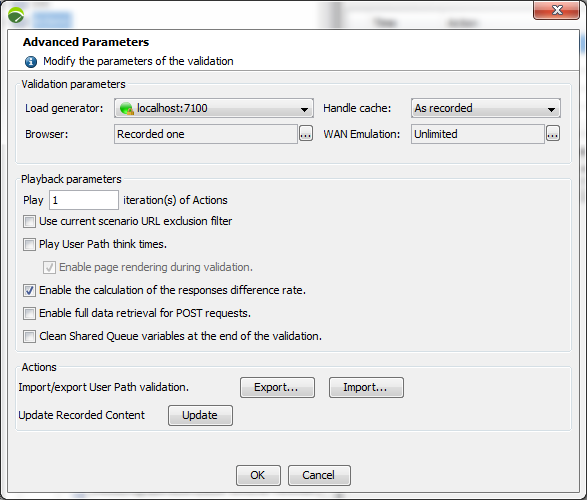
In the Check User Path dialog, a click on the Advanced button displays the Advanced Parameters dialog.
When advanced values and options are chosen in the Advanced Parameters dialog, it is necessary to start a new User Path checking process again, as documented in Check a User Path.
In the Virtual User Parameters box, the Validation parameters group box makes it possible to modify the operational conditions of the validation process:
By default, the localhost Load Generator is used for the Virtual User validation. It may be necessary however to use a remote Load Generator instead. For example, changing the local Local Generator for an remote one can be required to access an application stored in a secured environment.
The Load Generator drop-down list allows checking the Virtual User with one of the Load Generators available in the test scenario.
Initializing the cache when the Virtual Users are started can be defined in three behaviors in the Handle Cache drop-down list:
The Browser dialog makes it possible to define a browser profile used by the selected User Path. It may prove relevant to use a specific browser profile for a load test when the content of the server response depends on the browser used.
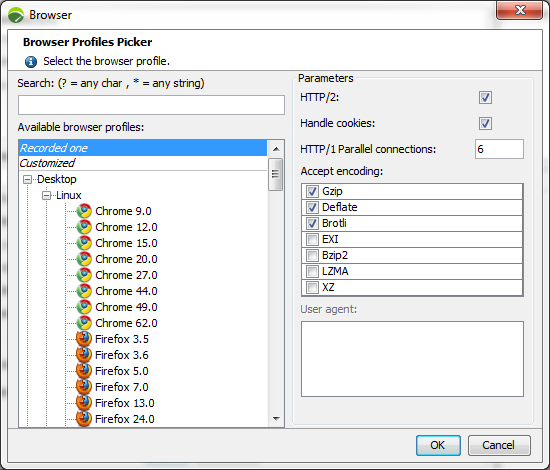
The Available browser profiles list makes it possible to select one of the following profiles:
C:\Program Files (x86)\NeoLoad 9.0\conf\pickers\browser_profiles folder. However, it is easier to configure a Customized profile in the Browser dialog when the need is specific.When a browser profile is selected, the Parameters group box displays its default and additional parameters:
SPDY is no longer supported and has been replaced by HTTP/2. The focus of HTTP/2 protocol is on performance; specifically, end-user perceived latency, network and server resource usage. One major goal is to allow the use of a single connection from browsers to a Web site. For more information about HTTP/2, see https://http2.github.io/.
A click on the picker button of the WAN Emulation field displays the WAN Emulation dialog box.
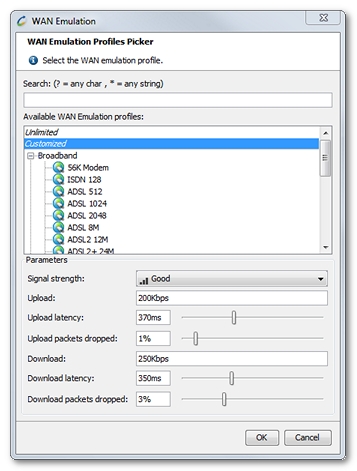
The WAN Emulation function is useful to simulate degraded network conditions with latency periods and packet loss percentages.
In the WAN Emulation dialog box, the Available WAN Emulation profiles list makes it possible to select one of the following profiles:
The values for the network conditions applicable in the tests are configured in the Parameters group box.
A click on the OK button closes the WAN Emulation box.
The easiest way to measure the latency and packet loss rate between a computer and a server is to use the ping command with enough requests to get a reliable number of packets lost. For example ping –n 100 www.myserver.com to send 100 packets.
When each packet has been sent, the program displays the statistics for response times (latency) and the number of packets sent, received and lost.
The latency given is a round-trip latency. It is necessary to divide the measure by two to get a sound approximation of upload and download latency.
A number of free mobile applications are available on mobile stores to send the same Ping commands as it can be done on computers. For example, Free Ping is one application on iOS.
These programs displays the statistics for response times (latency) and the number of packets sent, received and lost.
The latency given is a round-trip latency. It is necessary to divide the measure by two to get a sound approximation of upload and download latency.
In the Advanced Parameters dialog, the Playback parameters group box makes it possible to modify the functional conditions of the User Path used during the validation process:
With the Export button in the Actions group box, the current Virtual User check may be exported. In this case, NeoLoad creates an XML file containing all the sent requests, the server responses as well as the Load Generator log file. This may be useful for analyzing a script or when contacting the technical support team. Below is a sample of an XML export:
<?xml version="1.0" encoding="UTF-8" ?>
<Project user="JPetStore" population="Check-JPetStore-Population" lghost="localhost">
<StartContainer checkID="0" timestamp="703" objectID="2" objectName="JPetStore">
</StartContainer>
<StartContainer checkID="1" timestamp="797" objectID="3" objectName="Index"
size="1161" duration="109">
</StartContainer>
<StartPage checkID="2" timestamp="860" objectID="4" objectName="/jpetstore"
size="1161" duration="109">
</StartPage>
<Transaction checkID="3" timestamp="1000" objectID="5" objectName="http_1"
size="1701" duration="31">
<Request binary="false">
<Body><![CDATA[GET http://host/jpetstore/ HTTP/1.1...]]></Body>
</Request>
<Response code="200" type="text/html; charset=UTF-8">
<Headers><![CDATA[HTTP/1.1 200 OK...]]></Headers>
<Body><![CDATA[...]]></Body>
</Response>
</Transaction>
...
<LoadGeneratorLogFile fileName="VirtualUser.zip" nbEntry="1">
2012/08/20 12:00:08 INFO - neoload.LG_INFO: Starting LoadGenerator...
...
</LoadGeneratorLogFile>
</Project>
NeoLoad allows importing a Virtual User check that has been exported in XML format with a click on the Import button. The file to be imported can then be selected.
The Check User Path dialog helps you identify the number of changes between the recorded scenario and the checked one, and to pinpoint every change in the application with the Compare function, for example changes in paths, in URL arguments, in AJAX calls, and so on. The Update Recorded Content function makes it possible to merge the changes in the User Path, and synchronize it with the latest version of the application. It is particularly useful for test script maintenance.
The Update Recorded Content feature is available in the Check User Path dialog:
Alerts are raised when:
Errors must be fixed in the User Path definition, as described in Check a User Path.
A click on the Overwrite button updates the entire User Path to the current application, except for the requests which cannot be played. In the Check User Path dialog, the Difference column shows 0%.