Creating an on-demand Cloud session allows directly adding Cloud Load Generators to a NeoLoad project. Neotys can provide Cloud Load Generators in several geographical zones. Renting Cloud Load Generators requires Cloud credits, as described in Cloud credits or VUHs, as described in VUH.
Tip for Cloud Credits only: Before starting a test, it is advised to launch a sizing test and define the number and size (Medium or Large) of the Cloud Load Generators in every geographical zone required. For more information, see Cloud credits only: Size Cloud Load Generators.
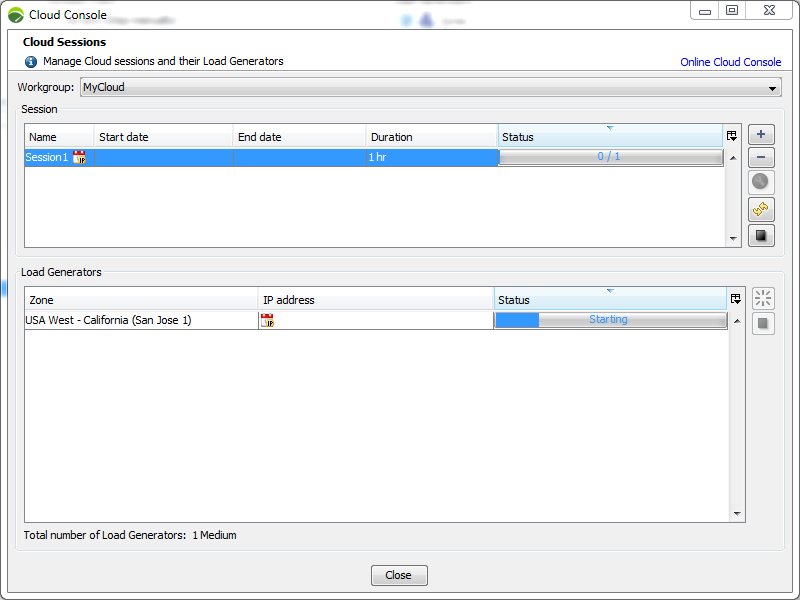
A Cloud session can be created on demand in the Cloud Console. The Cloud Console is accessible in the NeoLoad Controller:
with a click on the Open Cloud Console toolbar icon
with Tools > Cloud Console
from the Runtime section, with a click on the Open Cloud Console button in the Scenarios tab
from the Runtime section, with a click on Add a new host > Open Cloud Console in the Scenarios tab
The Cloud Console is displayed. In the Session group box, it is necessary to click the cloud icon to Add a Cloud session. The connection window is displayed to enter the account login details, as described in Connect to the NeoLoad Cloud Platform.
Once the NeoLoad Cloud Platform is accessed, the Cloud Session Creation Wizard is displayed.
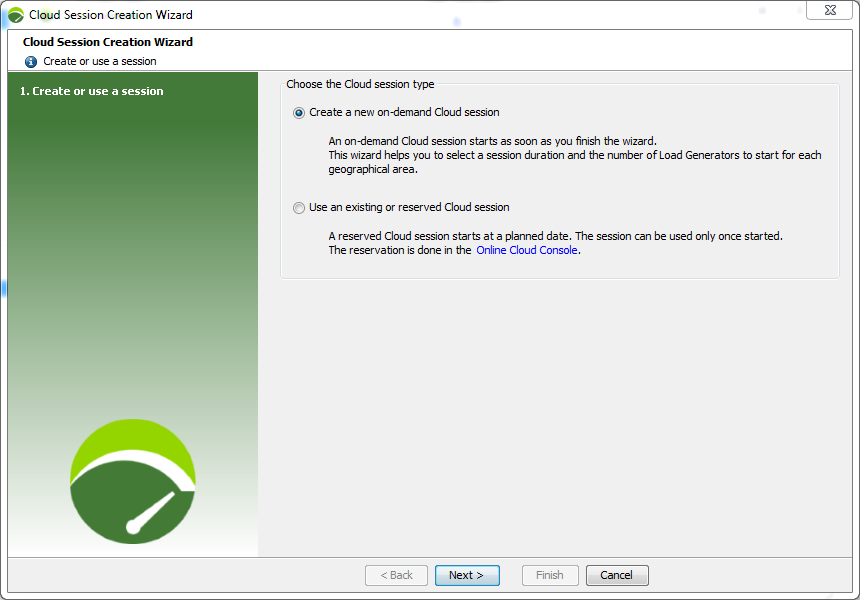
The Create a new on-demand Cloud session option must be selected before clicking on the Next button. The first Create a new session panel is displayed.
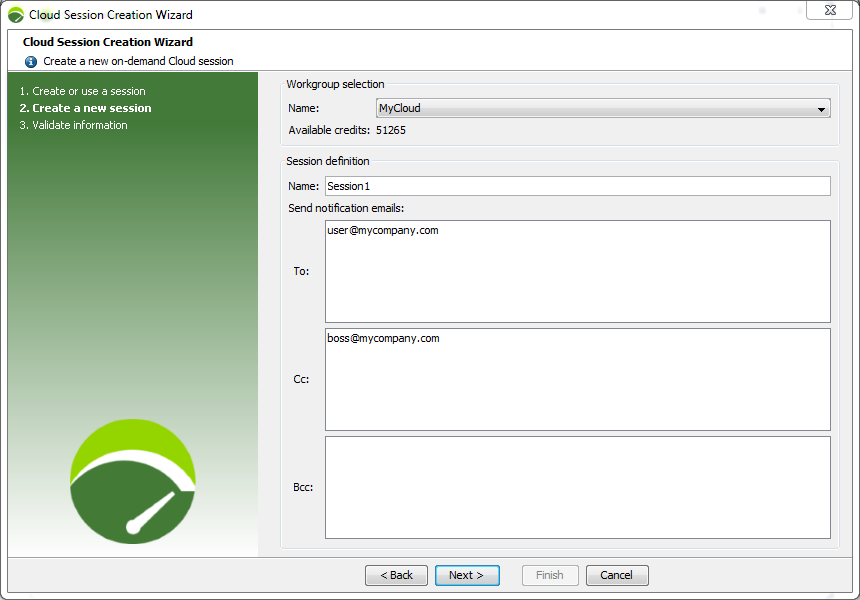
In the Workgroup selection group box, the Name drop-down list makes it possible to select the workgroup charged for the Cloud session. The Available credits or Available VUHs line displays your payment balance for the selected workgroup.
In the Session definition group box, it is necessary to specify:
the Name of the session or leave the default project name,
at least one email in the To notification field. Notification emails are sent when the session is started (the email contains the Load Generator IP addresses), 30 minutes before the session ends, and before and after the Cloud session effectively ends. Other To, Cc, and Bcc emails can be entered.
A click on the Next button displays the second Create a new session panel.
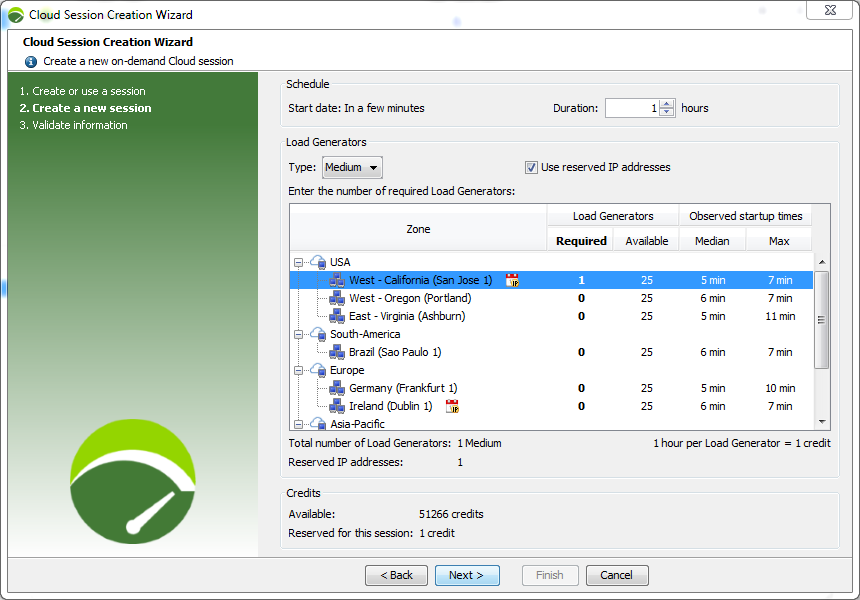
The Schedule group box makes it possible to select the duration of the session.
The Start date shows "In a few minutes", meaning that the on-demand Cloud session starts as soon as the wizard is closed and the Cloud Load Generators are available.
In Duration, the duration of the session in hours must be entered or selected.
Information: The startup time of the Cloud Load Generators is provisioned by Neotys to have the full control over the specified duration of the test and its cost.
The Load Generators group box is different according to your payment mode.
If you are using Cloud credits, choose the type of Cloud Load Generators:
Type is the dimension of the Cloud Load Generators:
Medium Load Generators rely on two cores and 800 MB of allocated memory. One medium Load Generator requires one Cloud credit per hour.
Large Load Generators rely on four cores and 6 GB of allocated memory. One large Load Generator requires two Cloud credits per hour.
These characteristics, and the available bandwidth values alike, may differ with the zone used.
The Use reserved IP addresses option is selected by default in case IP addresses have been reserved for the session. It is still possible to uncheck it if different IP addresses are to be used for this Cloud session.
The table lists the worldwide Cloud zones available. For every Zone:
If you are paying with VUHs: In the Virtual Users column, the Required field makes it possible to enter a number of Virtual Users. The necessary number of Cloud Load Generators is automatically updated in the Required field of the Load Generators column.
If you are paying with Cloud credits: In the Load Generators column, the Required field makes it possible to enter a number of Cloud Load Generators. The maximum number of Cloud Load Generators available is displayed in the Available column. By default, in most zones, a maximum number of 25 Cloud Load Generators can be started. For more Load Generators on a zone, contact a Neotys Account Manager.
The Observed startup times column provides information about the time required by a Cloud Load Generator for a given zone before it is up and running. The statistics derive from experienced times recorded by Neotys. The Median measure is the most realistic startup time. The Max measure is the longest time a NeoLoad Cloud Platform user had to wait before the Load Generator was ready.
Information: A session is made of either medium or large Load Generators. When necessary, distinct sessions can be created and used for a test.
Tip: Moving the mouse over a zone displays a tooltip with additional information like the name of the Cloud provider, the Minimum startup time observed, and the percentage of Cloud Load Generators In error on startup.
The Cost section shows the Available balance in Cloud credits or VUHs against the balance Reserved for this session according to the duration, type, zones, and number of Load Generators selected above. If credits or VUHs are missing for the Load Generators or Virtual Users selected, the information is displayed in red, and a link gives access to the Neotys Online Store to add more credits or VUHs on the fly.
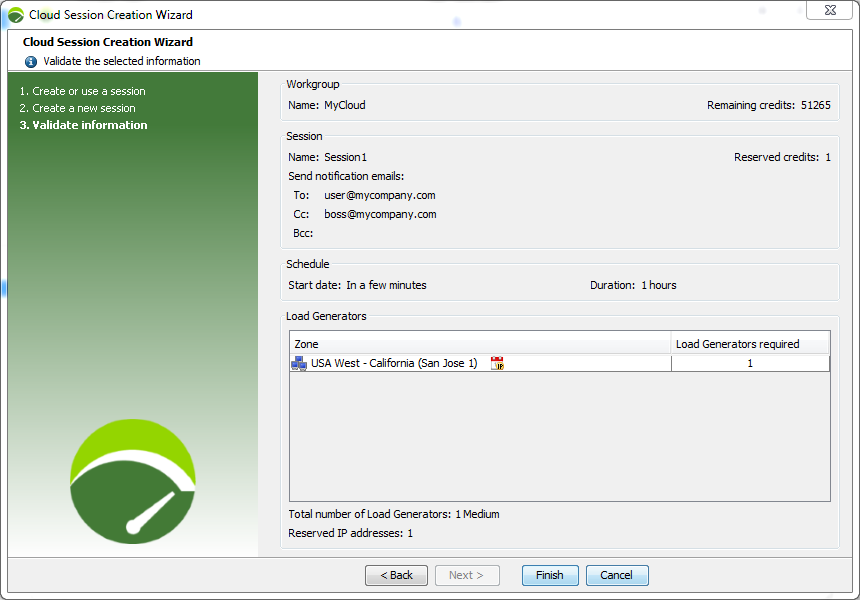
A click on the Next button displays the Validate information wizard screen.
After checking the information for the session, a click on the Finish button starts the session.
Once the session is created, the Cloud Console is displayed.
The console shows the starting process of the selected Cloud Load Generators. When the Cloud Load Generators are ready, the test can be started.
To create an on-demand Cloud session
In the NeoLoad Controller toolbar, choose Open Cloud Console.
In the connection window, enter your login details.
In the Cloud Console, click + (plus).
In the wizard, choose Create a new cloud session on-demand. Click Next.
In the next wizard step:
Select a workgroup.
In Name, enter the name of your session.
In To, enter a notification email. You can enter other To, Cc and Bcc emails.
Click Next.
In the next wizard step:
Enter the Duration of your session.
Cloud credits only: In the Type drop-down list, choose Medium or Large Load Generators for your session.
If you have reserved IP addresses, the Use reserved IP addresses option is selected by default, unselect it if you want to use different IP addresses for this Cloud session.
Enter the number of Cloud Load Generators (if you are using Cloud credits) or the number of Virtual Users (if you are using VUHs).
Click Next.
In the last wizard step, check the session information. Click Finish.